Egg.js 实现 OAuth2 授权码方式鉴权
方跃明 2020-01-07 杭州
@axolo/egg-oauth
适用于 node-oauth2-server 的 Egg.js 插件 @axolo/egg-oauth 已上线。
OAuth2 为统一安全管理平台解决方案(4A)中的认证环节解决方案。
| 英文名称 | 名称 | 说明 |
|---|---|---|
| Accounting | 账号 | 唯一身份 |
| Authentication | 认证 | 你是谁? |
| Authorization | 授权 | 你能干什么? |
| Audit | 审计 | 你干了什么? |
流程
服务
| 项目 | 地址 | 实现 |
|---|---|---|
| 数据端 | http://localhost:3000 | json-server |
| 资源端 | http://127.0.0.1:7001 | Egg.js,资源端与授权端共用为应用端 |
| 授权端 | http://127.0.0.1:7001 | Egg.js,资源端与授权端共用为应用端 |
| 客户端 | http://127.0.0.1:8080 | Vue.js |
目录
|-- config                              # 配置
|   |-- config.default.js               #   应用配置
|   `-- plugin.js                       #   插件配置
|-- app                                 # 应用
|   |-- controller                      #   控制器
|   |   `-- auth                        #     鉴权
|   |       |-- code.js                 #       授权码
|   |       `-- token.js                #       令牌
|   |-- middleware                      #   中间件
|   |   `-- auth.js                     #     鉴权中间件
|   `-- router.js                       #   路由
|-- lib                                 # 第三方库
|   `-- plugin                          #   插件
|       `-- oauth                       #     OAuth2Server插件
|           |-- app.js                  #       插件应用
|           |-- config                  #       插件配置
|           |   `-- config.default.js   #         插件默认配置
|           `-- lib                     #       功能库
|               `-- oauth.js            #         功能实现
`-- mock                                # 模拟
    `-- oauth                           #   OAuth模拟实现
        |-- model.js                    #     OAuth2Server Model Specification
        |-- db                          #     数据服务(json-server)
        |   `-- oauth.json              #       数据
        `-- www                         #     客户端
            |-- login.html              #       跳转请求授权码
            `-- redirect.html           #       携带授权码重定向
数据
安装json-server并启动数据服务。
服务
shell
yarn global add json-server
cd mock/oauth/db
json-server --watch oauth.json # 数据模型文件
模型
| 模型 | 说明 | 说明 |
|---|---|---|
| users | 授权用户 | 需结合资源端 |
| clients | 授权客户端 | 需结合资源端 |
| tokens | 令牌 | 授权端发放和校验 |
| codes | 授权码 | 授权端 |
mock/oauth/db/oauth.json
json
{
  "clients": [{
    "id": 1,
    "secret": "secret",
    "grants": [ "authorization_code" ],
    "redirectUris": [ "http://127.0.0.1:8080/#/redirect" ],
    "name": "client01",
    "logo": "http://127.0.0.1:8080/logo.png",
    "homepage": "http://127.0.0.1:8080"
  }],
  "users": [{
    "id": 1,
    "username": "user01",
    "password": "123456"
  }],
  "tokens": [{
    "accessToken": "4135e5ea8024023414f550305c941869960c9c87",
    "authorizationCode": "fb9d497f90eea632f308e016889715bad5671b0a",
    "accessTokenExpiresAt": "2020-01-07T13:59:58.601Z",
    "refreshToken": "df9824dbb371e6eb2e82b13c41fdc54a5c4c8bc8",
    "refreshTokenExpiresAt": "2020-01-21T11:59:58.601Z",
    "scope": [ "read", "write" ],
    "userId": "1",
    "clientId": "1",
    "id": 1
  }],
  "codes": [{
    "authorizationCode": "fb9d497f90eea632f308e016889715bad5671b0a",
    "expiresAt": "2020-01-07T12:04:57.394Z",
    "redirectUri": "http://127.0.0.1:8080/#/redirect",
    "scope": "",
    "userId": "1",
    "clientId": "1",
    "id": "1"
  }]
}
插件
安装并配置OAuth2 Server,将其实现为应用插件,并实现需自行实现的OAuth2Server model。
创建
shell
mkdir lib/plugin/egg-oauth && cd lib/plugin/egg-oauth
npm init egg --type=plugin
npm install
npm install oauth2-server --save # 注意:不是node-oauth2-server
配置
js
// lib/plugin/egg-oauth/config/config.default.js
exports.oauth = {
  default: {
    allowBearerTokensInQueryString: true,
    model: './app/extend/oauth', // relative path from app.baseDir
  },
  client: {},
};
功能
js
// lib/plugin/egg-oauth/lib/oauth.js
const path = require('path');
const OAuth2Server = require('oauth2-server');
class OAuth {
  constructor(options, app) {
    this.app = app;
    this.options = options;
    this.OAuth2Server = OAuth2Server;
    const serverOptions = { ...options };
    if (typeof options.model === 'string') {
      const model = require(path.join(app.baseDir, options.model))(options, app);
      Object.assign(serverOptions, { model });
    }
    this.server = new OAuth2Server(serverOptions);
  }
}
module.exports = OAuth;
实现
js
// lib/plugin/egg-oauth/app.js
const OAuth = require('./lib/oauth');
const createOauth = (options, app) => {
  const oauth = new OAuth(options, app);
  return oauth;
};
module.exports = app => {
  app.addSingleton('oauth', createOauth);
};
应用
OAuth插件配置和授权码获取页视图配置。
配置
启用插件、中间件,并根据应用需要对其配置,可覆盖默认配置,比model。
js
// app/config/plugin.js
module.exprots = {
  handlebars: {
    enable: true,
    package: 'egg-view-handlebars',
  },
  oauth: {
    enable: true,
    path: path.join(__dirname, '../lib/plugin/egg-oauth'),
  },
}
js
// app/config/config.default.js
config.view = {
  defaultViewEngine: 'handlebars',
  defaultExtension: '.hbs',
  mapping: {
    '.hbs': 'handlebars',
  },
},
config.oauth = {
  client: {
    model: './mock/oauth/model',
    requireClientAuthentication: { password: false },
    accessTokenLifetime: 7200,
  },
};
config.auth = {
  ignore: [ '/auth/login', '/auth/code', '/auth/token' ],
};
OAuth2 Server Model Specification
实现OAuth2 Server指定的Model。
js
// mock/oauth/model.js
const url = 'http://localhost:3000'; // json-server --watch db/oauth.json

class Model {
  constructor(options, app) {
    this.options = options;
    this.app = app;
  }

  async getClient(clientId, clientSecret) {
    const { app } = this;
    const { data: clients } = await app.curl(`${url}/clients`, {
      data: { id: clientId },
      dataType: 'json',
    });
    if (!clients.length) return;
    const client = clients[0];
    if (!client || (clientSecret && client.secret !== clientSecret)) return;
    return client;
  }

  async saveAuthorizationCode(code, client, user) {
    const { app } = this;
    // 务必将数据库格式化匹配数据模型后再存储
    const data = {
      ...code,
      expiresAt: code.expiresAt.toISOString(),
      userId: user.id,
      clientId: client.id,
    };
    await app.curl(`${url}/codes`, { method: 'POST', data, dataType: 'json' });
    return code;
  }

  async getAuthorizationCode(authorizationCode) {
    const { app } = this;
    // 以`authorizationCode`查询授权码`code`,关联用户`user`和客户端`client`返回
    const { data: codes } = await app.curl(`${url}/codes`, {
      data: { authorizationCode, _expand: [ 'user', 'client' ] },
      dataType: 'json',
    });
    if (!codes.length) return;
    const code = { ...codes[0], expiresAt: new Date(codes[0].expiresAt) };
    return code;
  }

  async revokeAuthorizationCode(code) {
    const { app } = this;
    const { authorizationCode } = code;
    const { data: codes } = await app.curl(`${url}/codes`, {
      data: { authorizationCode },
      dataType: 'json',
    });
    if (!codes.length) return true;
    const res = await app.curl(`${url}/codes/${codes[0].id}`, {
      method: 'DELETE',
      dataType: 'json'
    });
    if (res.status === 200) return true;
    return res;
  }

  async validateScope(user, client, scope) {
    const { app } = this;
    if (!scope) return client.scopes;
    return scope.split(',').filter(s => client.scopes.includes(s));
  }

  async saveToken(token, client, user) {
    const { app } = this;
    // 务必将数据库格式化匹配数据模型后再存储,实际应用需要验证client、user,此处省略
    const data = {
      ...token,
      accessTokenExpiresAt: token.accessTokenExpiresAt.toISOString(),
      refreshTokenExpiresAt: token.refreshTokenExpiresAt.toISOString(),
      userId: user.id,
      clientId: client.id,
    };
    await app.curl(`${url}/tokens`, { method: 'POST', data, dataType: 'json' });
    return { ...token, client, user };
  }

  async getAccessToken(accessToken) {
    const { app } = this;
    // 以`authorizationCode`查询授权码`code`,关联用户`user`和客户端`client`返回
    const { data: tokens } = await app.curl(`${url}/tokens`, {
      data: { accessToken, _expand: [ 'user', 'client' ] },
      dataType: 'json',
    });
    if (!tokens.length) return;
    const token = {
      ...tokens[0],
      accessTokenExpiresAt: new Date(tokens[0].accessTokenExpiresAt),
      refreshTokenExpiresAt: new Date(tokens[0].refreshTokenExpiresAt),
    };
    return token;
  }

}

module.exports = (options, app) => new Model(options, app);
路由
定义授权码、令牌和授权用户信息路由。
js
// app/router.js
router.resources('/auth/code', controller.auth.code);
router.resources('/auth/token', controller.auth.token);
router.resources('/auth/user', controller.auth.user);
鉴权中间件
可以简单的理解为验证请求携带的令牌是否正确,正确则通过,否则返回401错误。
js
// app/middleware/auth.js
module.exports = config => {
  return async (ctx, next) => {
    const { oauth } = ctx.app;
    const { Request, Response } = oauth.OAuth2Server;
    const request = new Request(ctx.request);
    const response = new Response({ headers: {} });
    const authenticate = await oauth.server.authenticate(request, response);
    ctx.state.auth = authenticate;
    ctx.logger.info(config);
    await next();
  };
};
授权码控制器
Authorization Code Grants必须实现authenticateHandler,获取授权用户详情。 有多种实现方式,比如可以以资源端Session和Cookie方式实现免登获取。
js
// app/controller/auth/code.js
'use strict';
const url = 'http://localhost:3000';
const Controller = require('egg').Controller;
class CodeController extends Controller {
async index() {
const { app, ctx } = this;
const { querystring, query } = ctx.request;
// 从请求获取客户端详情,展示并提供允许和拒绝按钮供用户选择
const { data: clients } = await app.curl(`${url}/clients`, {
data: { id: query.client_id },
dataType: 'json',
});
if (!clients.length) { ctx.status = 403; return; }
const client = clients[0];
await ctx.render('auth/code/index.hbs', { querystring, client });
}
async create() {
const { app, ctx } = this;
const { query } = ctx.request;
const { oauth } = app;
const request = new oauth.OAuth2Server.Request(ctx.request);
const response = new oauth.OAuth2Server.Response({ headers: {} });
// 参数:用户名、密码(登录表单),返回:授权用户详情(user对象)
const authenticateHandler = {
async handle(req) {
const { username, password } = req.body;
const { data: users } = await app.curl(`${url}/users`, {
data: { username },
dataType: 'json',
});
if (!users.length) return; // 503
const user = users[0];
if (password !== user.password) return; // 503
return user;
},
};
const authorize = await oauth.server.authorize(request, response, {
authenticateHandler
});
const { authorizationCode, redirectUri } = authorize;
ctx.redirect(`${redirectUri}?code=${authorizationCode}&state=${query.state}`);
}
}
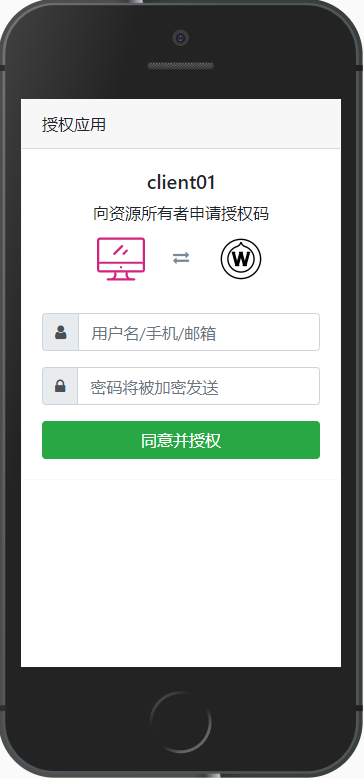
module.exports = CodeController;html
<!DOCTYPE html>
<html lang="en">
<head>
  <meta charset="UTF-8">
  <meta name="viewport" content="width=device-width, initial-scale=1.0">
  <meta http-equiv="X-UA-Compatible" content="ie=edge">
  <title>授权应用</title>
  <link rel="stylesheet" href="https://stackpath.bootstrapcdn.com/bootstrap/4.3.1/css/bootstrap.min.css">
  <link rel="stylesheet" href="https://stackpath.bootstrapcdn.com/font-awesome/4.7.0/css/font-awesome.min.css">
</head>
<body>
  <div id="login">
    <div class="card border-light">
      <div class="card-header">
        授权应用
      </div>
      <div class="card-body">
        <div class="card-title text-center">
          <h5>{{client.name}}</h5>
          <div>向资源所有者申请授权码</div>
          <div>
            <img src="{{client.logo}}" alt="{{client.name}}">
            <i class="exchange fa fa-exchange"></i>
            <img src="/public/logo.png" alt="Egg.js OAuth2Server">
          </div>
        </div>
        <div class="card-text">
          <form class="form" method="POST" action="/auth/code?{{querystring}}">
            <div class="form-group">
              <label class="sr-only" for="username">Username</label>
              <div class="input-group">
                <div class="input-group-prepend">
                  <div class="input-group-text"><i class="fa fa-user"></i></div>
                </div>
                <input
                  id="username"
                  class="form-control"
                  name="username"
                  placeholder="用户名/手机/邮箱"
                  required
                >
              </div>
            </div>
            <div class="form-group">
              <label class="sr-only" for="password">Password</label>
              <div class="input-group">
                <div class="input-group-prepend">
                  <div class="input-group-text"><i class="fa fa-lock"></i></div>
                </div>
                <input
                  id="password"
                  class="form-control"
                  type="password"
                  name="password"
                  placeholder="密码将被加密发送"
                  required
                >
              </div>
            </div>
            <button type="submit" class="btn btn-block btn-success submit">
              同意并授权
            </button>
          </form>
        </div>
      </div>
    </div>
  </div>
</body>
</html>
令牌控制器
js
const Controller = require('egg').Controller;
class TokenController extends Controller {
  async create() {
    const { app, ctx } = this;
    const { oauth } = app;
    const request = new oauth.OAuth2Server.Request(ctx.request);
    const response = new oauth.OAuth2Server.Response({ headers: {} });
    const token = await oauth.server.token(request, response);
    const res = {
      access_token: token.accessToken,
      expires_in: oauth.server.options.accessTokenLifetime,
    };
    ctx.body = res;
  }
}
module.exports = TokenController;
授权详情控制器
返回必要的用户信息,很多客户端框架需要此信息,如:Nuxt.js Auth。
js
// app/controller/auth/user.js
const Controller = require('egg').Controller;
class UserController extends Controller {
  async index() {
    const { ctx } = this;
    const res = ctx.state.auth;
    ctx.body = res;
  }
}
module.exports = UserController;
客户端
模拟环境以Vue.js实现,代码过多。简单起见,本文仅展示部分关键代码。
请求授权码
html
<a href="http://127.0.0.1:7001/auth/code?response_type=code&client_id=1&state=ok&redirect_uri=http%3A%2F%2F127.0.0.1%3A8080%2F%23%2Fredirect">
  <button>跳转授权端申请授权码</button>
</a>| 参数 | 必须 | 说明 | 参考值 |
|---|---|---|---|
| response_type | 是 | 响应类型,code = 授权码方式 | code |
| client_id | 是 | 客户端ID,应用在授权端注册的客户端ID | 1 |
| state | 是 | 内部状态,客户端自定义,原封不动返回 | ok |
| redirect_uri | 否 | 授权码客户端接收地址,必须允许的成员 | http://127.0.0.1:8080/#/redirect |
| scope | 否 | 存取范围,资源端自定义 | read |
请求令牌
js
import qs from 'qs'
import axios from 'axios'
export default {
  created() {
    const { code, state } = this.$route.query
    const data = {
      code,
      state,
      grant_type: 'authorization_code',
      redirect_uri: 'http://127.0.0.1:8080/#/redirect',
      client_id: '1',
      client_secret: 'secret'
    }
    axios({
      method: 'POST',
      url: 'http://127.0.0.1:7001/auth/token',
      headers: { 'Content-Type': 'application/x-www-form-urlencoded' },
      data: qs.stringify(data) // 请务必注意格式转换
    }).then(res => {
      console.info(res)
    }.catch(err => {
      console.err(err)
    })
  }
}| 参数 | 值 | 必须 | 说明 |
|---|---|---|---|
| headers | Content-Type=application/x-www-form-urlencoded | 是 | 请求头 |
| method | POST | 是 | 必须是POST方法,请务必注意格式转换 |
| grant_type | authorization_code | 是 | authorization_code = 授权码方式 |
| client_id | 1 | 是 | 客户端ID |
| client_secret | secret | 是 | 客户端密钥,默认情况不能为空 |
| code | 934ab7ed580db30c58492414969b2dc3b38736ce | 是 | 跳转链接携带的授权码 |
| state | ok | 否 | 客户端自定义状态 |
| redirect_uri | http://127.0.0.1:8080/#/redirect | 否 | 跳转链接 |
访问接口
请求头携带令牌访问资源服务器。
shell
curl 'http://127.0.0.1:7001' \
-H 'Authorization: Bearer 0e55b110f79023e7073a1a80db9fc72b5414ab53'
# 正确则返回数据:hi, egg,错误一般返回401错误若配置allowBearerTokensInQueryString为true,还可以携带请求参数访问,如下:
shell
curl 'http://127.0.0.1:7001?access_token=0e55b110f79023e7073a1a80db9fc72b5414ab53'总结
- 深刻理解OAuth2原理和各种模式的授权流程
- 务必熟读oauth2-server官方文档
- 注意必须实现的
Handler,如:授权码模式authorize必须authenticateHandler - 注意必要参数和必要返回,以及它们的格式,OAuth的实现是有前后依赖
参考