WebVirtCloud 部署笔记
方跃明 2013-12-30
系统配置
SELinux
允许WebVirtCloud通行
shell
sudo semanage fcontext -a -t httpd_sys_content_t "/srv/webvirtcloud(/.*)"或关闭SELINUX
shell
vi /etc/selinux/configini
SELINUX=disabled防火墙
允许nginx和novnc通行。
shell
firewall-cmd --zone=public --add-port=80/tcp --permanent      # nginx
firewall-cmd --zone=public --add-port=6080/tcp --permanent    # novnc
firewall-cmd --reload
安装KVM
虚拟化支持
执行以下命令,若有高亮vmx或svm输出表示硬件支持虚拟化。
shell
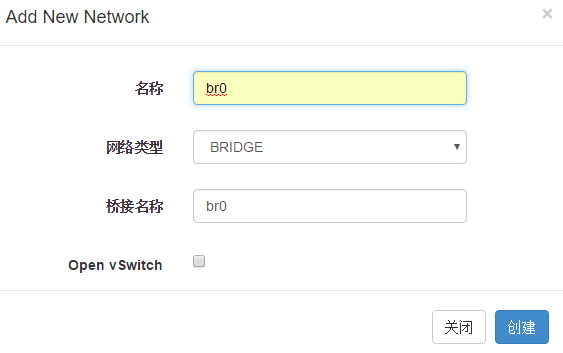
egrep '(vmx|svm)' --color=always /proc/cpuinfo设置网桥
网桥相当于外网和虚拟机之间的交换机。
             +-----------+     +----------+     +----------+
Internet --- | HOST eth0 | --- | HOST br0 | --- | VMs eth0 | --- VMs
             +-----------+     +----------+     +----------+
shell
cp /etc/sysconfig/network-scripts/ifcfg-enp2s0 /etc/sysconfig/network-scripts/ifcfg-br0ini
TYPE=Bridge                                   # 类型为网桥
PROXY_METHOD=none
BROWSER_ONLY=no
BOOTPROTO=dhcp                                # MAC未绑定IP时建议配置静态IP
DEFROUTE=yes
IPV4_FAILURE_FATAL=no
IPV6INIT=yes
IPV6_AUTOCONF=yes
IPV6_DEFROUTE=yes
IPV6_FAILURE_FATAL=no
IPV6_ADDR_GEN_MODE=stable-privacy
NAME=br0                                      # 名称
# UUID=87cd35a1-1421-4066-a7bc-9d8ba4e727d5   # 注释掉
DEVICE=br0                                    # 设备
ONBOOT=yes
ZONE=public
shell
vi /etc/sysconfig/network-scripts/ifcfg-enp2s0ini
BRIDGE=br0
TYPE=Ethernet
PROXY_METHOD=none
BROWSER_ONLY=no
BOOTPROTO=dhcp
DEFROUTE=yes
IPV4_FAILURE_FATAL=no
IPV6INIT=yes
IPV6_AUTOCONF=yes
IPV6_DEFROUTE=yes
IPV6_FAILURE_FATAL=no
IPV6_ADDR_GEN_MODE=stable-privacy
NAME=enp2s0
UUID=87cd35a1-1421-4066-a7bc-9d8ba4e727d5
DEVICE=enp2s0
ONBOOT=yes
ZONE=public
shell
systemctl restart network
brctl show
安装KVM依赖
shell
yum install kvm qemu-kvm qemu-kvm-tools libvirt libvirt-python libvirt-client
yum install virt-install python-virtinst bridge-utils libguestfs-tools| 名称 | 必须 | 说明 |
|---|---|---|
| kvm | 是 | KVM核心,KVM虚拟机模块 |
| qemu-kvm | 是 | QEMU模拟器,QEMU KVM虚拟化模拟器 |
| qemu-kvm-tools | 是 | QEMU工具,QEMU工具 |
| libvirt | 是 | 虚拟化API,虚拟化平台的开源的API |
| libvirt-python | 是 | libvirt Python语言支持 |
| libvirt-client | libvirt 客户端 | |
| virt-install | 虚拟机安装工具 | |
| python-virtinst | 虚拟机安装工具Python语言支持 | |
| brige-utils | 网桥管理工具 | |
| libguestfs-tools | 虚拟机镜像管理工具 | |
| virt-manager | 虚拟机管理工具,需要GUI | |
| virt-viewer | 虚拟机查看工具,需要GUI | |
| virt-v2v | 虚拟机镜像转换工具 |
设置服务
shell
systemctl enable libvirtd   # 设置服务自启动
systemctl start libvirtd    # 启动服务
安装WebVirtCloud
参见:https://github.com/retspen/webvirtcloud
更新 hypervisor gstfsd
shell
wget -O - https://clck.ru/9VMRH | sudo tee -a /usr/local/bin/gstfsd
sudo service supervisor restart
获取SECRET_KEY
shell
vi /srv/webvirtcloud/webvirtcloud/settings.pypython
import random, string
haystack = string.ascii_letters + string.digits + string.punctuation
print(''.join([random.SystemRandom().choice(haystack) for _ in range(50)]))
安装WebVirtCloud控制台
安装WebVirtCloud依赖
shell
yum install python-virtualenv python-devel libvirt-devel
yum install glibc gcc nginx supervisor python-lxml git python-libguestfs
克隆仓库
shell
sudo mkdir /srv && cd /srv
sudo git clone https://github.com/retspen/webvirtcloud && cd webvirtcloud
cp webvirtcloud/settings.py.template webvirtcloud/settings.py
# now put secret key to webvirtcloud/settings.py
开始安装WebVirtCloud
shell
sudo virtualenv venv
sudo source venv/bin/activate
sudo venv/bin/pip install -r conf/requirements.txt
sudo cp conf/nginx/webvirtcloud.conf /etc/nginx/conf.d/
sudo venv/bin/python manage.py migrate
配置supervisor
shell
vi /etc/supervisord.confini
# 把以下内容添加到 [include] 段的 `files = ...` 之后
[program:webvirtcloud]
command=/srv/webvirtcloud/venv/bin/gunicorn webvirtcloud.wsgi:application -c /srv/webvirtcloud/gunicorn.conf.py
directory=/srv/webvirtcloud
user=nginx
autostart=true
autorestart=true
redirect_stderr=true
[program:novncd]
command=/srv/webvirtcloud/venv/bin/python /srv/webvirtcloud/console/novncd
directory=/srv/webvirtcloud
user=nginx
autostart=true
autorestart=true
redirect_stderr=true
配置nginx
注释nginx原有server段相关配置
shell
vi /etc/nginx/nginx.confnginx
#    server {
#        listen       80 default_server;
#        listen       [::]:80 default_server;
#        server_name  _;
#        root         /usr/share/nginx/html;
#
#        # Load configuration files for the default server block.
#        include /etc/nginx/default.d/*.conf;
#
#        location / {
#        }
#
#        error_page 404 /404.html;
#            location = /40x.html {
#        }
#
#        error_page 500 502 503 504 /50x.html;
#            location = /50x.html {
#        }
#    }
}
确保webvirtcloud.conf配置正确
shell
cat /etc/nginx/conf.d/webvirtcloud.confnginx
upstream gunicorn_server {
    #server unix:/srv/webvirtcloud/venv/wvcloud.socket fail_timeout=0;
    server 127.0.0.1:8000 fail_timeout=0;
}
server {
    listen 80;

    server_name servername.domain.com;
    access_log /var/log/nginx/webvirtcloud-access_log;

    location /static/ {
        root /srv/webvirtcloud;
        expires max;
    }

    location / {
        proxy_pass http://gunicorn_server;
        proxy_set_header X-Real-IP $remote_addr;
        proxy_set_header X-Forwarded-for $proxy_add_x_forwarded_for;
        proxy_set_header Host $host:$server_port;
        proxy_set_header X-Forwarded-Proto $remote_addr;
        proxy_connect_timeout 600;
        proxy_read_timeout 600;
        proxy_send_timeout 600;
        client_max_body_size 1024M;
    }
}
用户和组设置
shell
useradd webvirtmgr
usermod -G kvm -a webvirtmgr
启动服务
shell
systemctl restart nginx
systemctl restart supervisord
shell
supervisorctl statusgstfsd RUNNING pid 24662, uptime 6:01:40
novncd RUNNING pid 24661, uptime 6:01:40
webvirtcloud RUNNING pid 24660, uptime 6:01:40添加SSH KEY
用于控制台添加基础架构
shell
su -s /bin/bash nginx
ssh-keygen
ssh-copy-id root@serverip
you need to accept add key
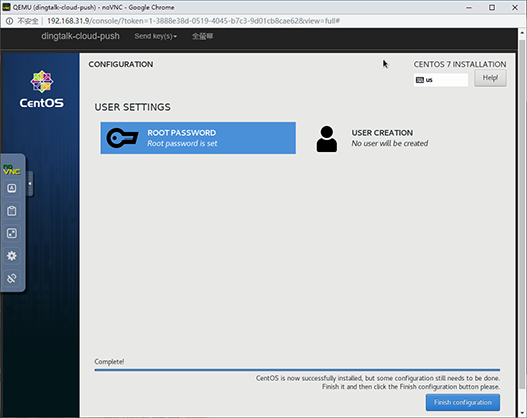
exit控制台
进入控制台
shell
open http://serverip
# username: admin
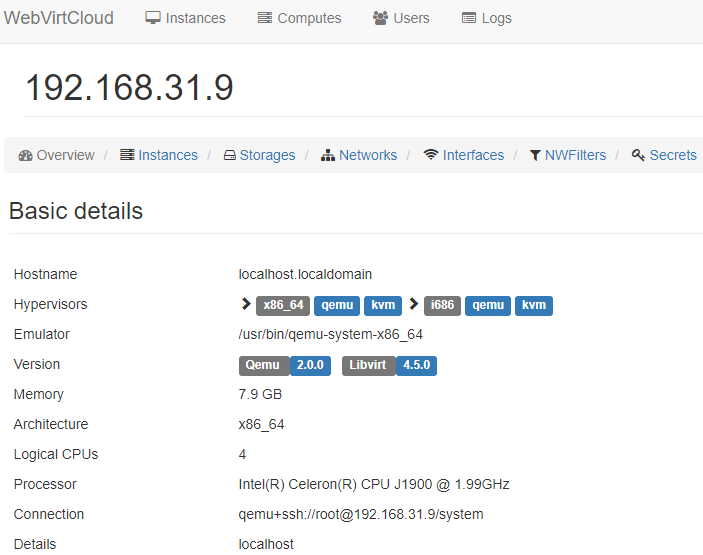
# password: admin基础架构
存储池
shell
chmod 755 -R /home/webvirtmgr/home/webvirtmgr
|-- images # 磁盘镜像
`-- iso # 光盘镜像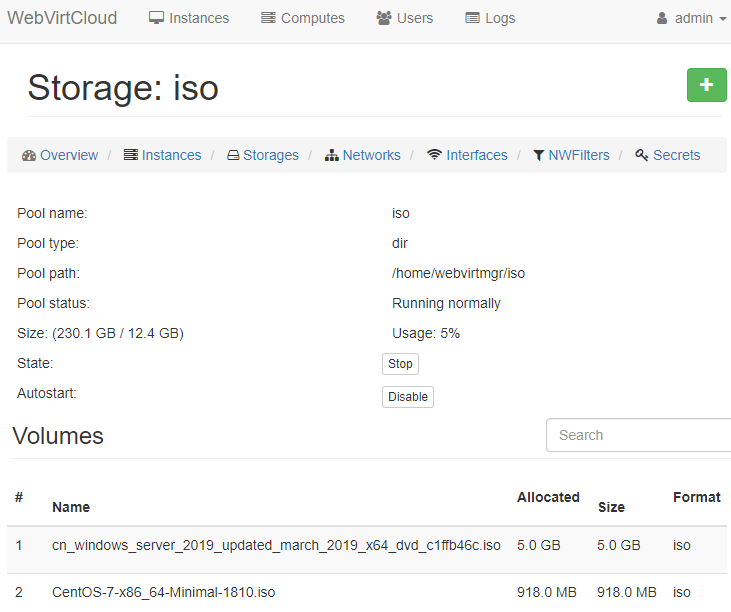
网络
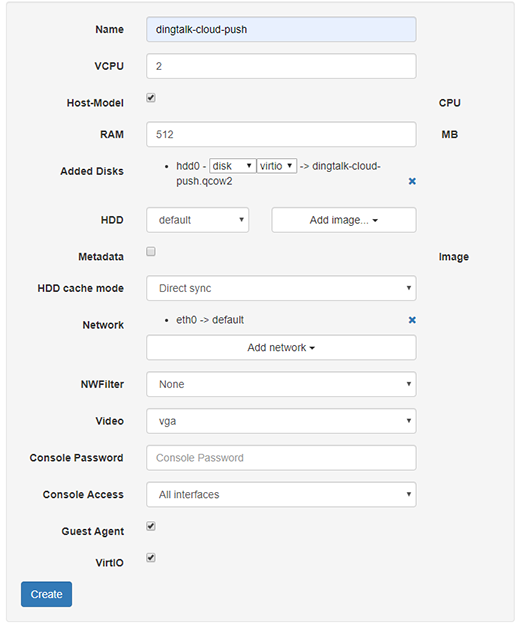
实例
会话